So you’ve finally bought that spy camera pen that you’ve been looking at for a long time, but you didn’t get any spy pen instructions to go along with the pen. With this tutorial, the Gadgetsspy Team is going to give you the spy camera pen instructions that you need to go on your way to using this pen exactly how you want to any time you need it to do what you want. It’s important to note that these instructions will work for the majority of spy pens available today but some models may differ. Depending on the manufacturer of your specific model, you might be left with one you don’t really know how to use. If you haven’t yet please go ahead and click here for the best spy pen guide.
First Things First, You Need To Make Sure Everything Is Working Properly
Before you use your pen for something truly important, it might be a good idea to check whether everything works as intended. When you unbox it, make sure you plug it in your computer’s USB port and charge it. Leave it for a good couple of hours, because the first charge should be complete, up to 100%. Note that all subsequent charges will usually take much less time.
You should probably plug your spy pen into the USB port so that you can charge it up to have it ready to use for your first outing with the pen. Once you get the pen charged up you can then move on to the next step of getting your spy pen working exactly the way that you want it to. Once you do your initial charging of the pen, which is usually about 4 hours, you will only have to recharge the pen for about 15 minutes from that point onward so you can use your pen quickly and as much as you want to.
Your spy pen comes with a MicroSD card, you want to make sure that it’s working properly and then inserted it inside the pen so that you can record. You have to have the MicroSD card in order for the pen to work. Without it, the pen won’t work as it’s intended to. After this, you should check the storage. Some pens will come with built-in storage, while others will require you to insert a memory card.
Getting Started With Your Brand New Spy Pen
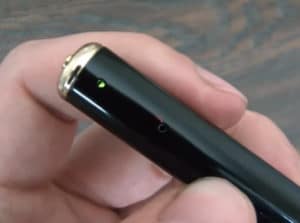 This next step of the spy pen camera instructions requires you to turn on your brand new spy pen and that’s what you’ve been wanting to do since you got it isn’t it? Now it’s time to do so and in order to do that, you need to click the top of the pen just like you would using any regular pen and you are on your way to becoming Tom Cruise in Mission Impossible! Once you have clicked the button at the top of the pen you should see a light that will tell you that the pen has turned on correctly and you are good to go.
Once you’ve turned it on, there are two options. Some pens will start recording instantly when they’re turned on, which means they’re rather quickly. On the other hand, others will require you to hold that same button for a couple of seconds after you’ve turned the pen on, and only then they’ll start recording. Whichever it is, it’s a rather simple thing to do, and you won’t have any problems with it.
If you want to start recording from your pen you need to hold the same button that you used to turn on the pen for 2 to 3 seconds which will then start the recording mode of the spy pen. You will know that the recording mode has started because the light will start blinking to indicate that it is now in recording mode.
When you are ready to stop the recording mode just click on the button that you used to turn on the pen and the recording mode and it will then be turned off. If you want your pen to be completely off, then you need to hold the button down for at least 6 seconds and the spy pen will be completely turned off.
If you want to just take pictures with your spy pen, then all you have to do is make sure the pen is turned on and just click on the on/off button once and the light will flash telling you that it has taken the picture that you wanted it to. It’s really as simple as that.
Viewing All Of The Video And Pictures That You’ve Taken With Your Spy Pen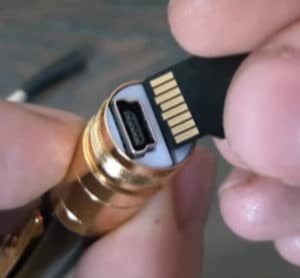
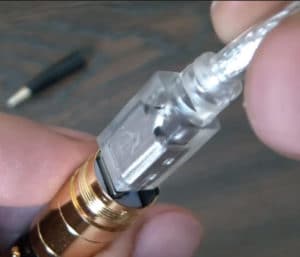
Once you’ve captured a few photos and videos, of course, you’ll want to review them and see what you captured. How you do this will greatly depend on the type of pen you have. When you have one with built-in storage, it’s also going to have a micro or mini USB port at the top, too, right below the cap. Use this port to connect it to your computer, and you’ll be able to access all the files that are on it from there.
The other option is a pen that uses a memory card as opposed to built-in storage. Here, you’ve got two options. The first one is to plug it in, just like you would with one with built-in storage. The memory card should show up as a regular storage device on your computer, and you can access the videos easily. The other option is to use a memory card reader. Just remove the memory card, and insert it in a card reader. It’s going to appear on your computer like an external drive, and all the files will be on it.
One thing to note is that whether it’s built-in storage or a memory card, you will be limited in terms of how much footage you can keep on the pen itself. In order to make sure your pen is ready for usage again, you’ll want to copy the footage to your computer, and erase it from the pen itself. This will make sure there’s plenty of room for new footage to be recorded.
To add to this, some pens will come with loop recording, but this is usually reserved for the more premium models. Loop recording means that when your memory card fills up, the newest footage that you want to record will overwrite the oldest one. While you’ll be losing some footage, you do get to keep the latest footage you need, which is crucial.
If you want to view all of the data you’ve taken with your pen and you need to plug your pen into the USB port by unscrewing the pen until you see the USB port and then plug it into your computer. After you connect the USB cable to your pen and then to your computer, then wait until the MicroSD shows up on your computer and double-click it. Once you do this you will open up all the contents that have been saved to the MicroSD and you can see all of the footage and pictures that you’ve taken with your spy pen. Another thing you should think about when viewing your videos and pictures is to move all of your files from the MicroSD to your computer so that you can see your footage in the best possible manner you can.
Reusing Your Spy Pen Is As Easy As Erasing The Data On Your MicroSD Card
Once you have gotten all the footage off of your MicroSD card you can then erase all of it and have your spy pen ready to use again the next time you feel like having fun and playing around with the spy pen. You can erase all of your data by either deleting each file one by one or using the format function option on your computer which will bring your MicroSD card back to its original state. Either way works just fine and your pen will be ready for the next use.
This Step Is For The More Advanced Of The Bunch
If you feel like putting a date to all of your information on the MicroSD card or you want to change the date on the card, then all you have to do is connect your spy pen to your computer and you will find a time.txt file and with this file, you can change the time and date within the file and then save it after you’re done. Once you have done this the time and date will be exactly where you want it to be the next time you are out.
This guide is all that you have to do to have your spy pen working exactly as you want. Please also remember that the greater majority of spy pens use these instructions however they will differ from some spy pens in the market that are created slightly differently. However, most will retain the same concepts of the USB and the click on and off.
